Showing posts with label Blogging Tips. Show all posts

Tuesday, 2 May 2017

How to resolve Async XML parsing error when saving Google Adsense code in Blogger?


If you are a Blogger trying to integrate Google Adsense on your blog, you might have encountered and "async error" if you add the Google Adsense code in Blogger template as it is. Google Adsense provides JavaScript code which can be added to websites and blog platforms to display Google Ads. A typical Google Adsense (asynchronous) Code looks like this:


<script async src="//pagead2.googlesyndication.com/pagead/js/adsbygoogle.js"></script>
<script>
  (adsbygoogle = window.adsbygoogle || []).push({
    google_ad_client: "ca-pub-XXXXXXXXXXXXXX",
    enable_page_level_ads: true
  });
</script>
 The error message on Blogger looks like this:


  "Attribute name "async" associated with an element type "script" must be followed by the ' = ' character."
In this post, we will see how to modify the Google Adsense code so that the error is resolve in Blogger templates.


If you get XML parsing error when adding Google Adsense code as it is in Blogger template, then modify the Google Adsense code a bit to resolve the error in Blogger.  A typical Google Adsense (Asynchronouse) code begins with:

<script async src="//pagead2.googlesyndication.com/pagead....</script>
<script>
 .......................................... </script>
  And the error says:

"Attribute name "async" associated with an element type "script" must be followed by the ' = ' character."
Which means, Blogger is expecting an equal sign (=) right after the word "async".


 Solution:
Add ="async" right after async in the Google Adsense code.

Before: Orginal Google Adsense code

 <script async src="//pagead2.googlesyndication.com/pagead....</script>
<script>
 .......................................... </script>
After: modified 

 <script async="async" src="//pagead2.googlesyndication.com/pagead/js/adsbygoogle.js"></script>
 After the change, Blogger Template should save successfully without any XML parsing error.

 
Share:

Wednesday, 8 February 2017

Sponsored Post: How to increase traffic to your blog through Instagram

How to increase traffic to your blog through Instagram


Getting new readers to your blog can seem like an impossible challenge. However, using social media you can create a consistent stream of readers who follow links straight from Instagram, Facebook etc, right to your posts.

Instagram is highly competitive, but by using an Instagram bot you will be able to gain an edge over your competitors. The best instagram bot, in our opinion, is SocialGrow. It is simple and easy to use, as all you need to do is enter your settings to decide what types of people you wish to target. Then, SocialGrow handles the rest, sifting through Instagram to like content that is similar to your page. Other users will start to follow these links back to your pack which will mean more likes, follows and comments, and ultimately more users tapping on your website link and landing on your blog.

However, an Instagram bot is not a miracle solution. You still need to make sure that you:

(1) Post amazing content - even if you are getting more traffic to your page, these people will not engage with you if your page is boring or has bad photos.

 (2) Engage with your fans - make sure that you are encouraging your followers to become long term fans (and readers of your blog!) by engaging with them, tagging them and generally bringing them into your community.

 (3) Build connections with similar pages - build a network of pages similar to yours so you can all shout each other out, share content, and generally grow together. Your direct competitors can become your closest allies if it’s beneficial for you both to grow your pages at the same time!

Instagram is difficult to master, but a combination of a bot and genuine content can put you on the track to complete success
Share:

Friday, 3 February 2017

How To Make Your Adsense Ads Appear Below and Above post In Blogger

Today on Build a Perfect Blog. I will be sharing with you some simple tricks, Which is How you can put your adsense ads Below and Above Post in Blogger.


This Topic is very Common but still many did not understand it. But in Build a Perfect Blog today i will take out my time an explain to you the usefulness of Putting your adsense ads below and Above post and also How you can Achieve that.


Usefulness of Putting Your Adsense Ads Below and Above post.

When you first get approve for Google adsense the Next thing you would love to do is place the banner codes on your site. In placing your codes to your site the is a factor to consider which is. 'Where can this Codes get me more Click and increase my Earning' Before a Reader can read any Post in a Blog he or she must first scroll pass the Title Tag in side the post. And also before a Reader must comment or share a particular post in a Blog he or she will also see the Ads immediately after the post. You can agree with me that when an Ads is placed Above and Below post there is a Probability that, That particular Ads will get more click.

How Do I Place The Ads Above and Below Post.


Step 1: Log in to your Publisher account. Get the Ads code copy them using CTR+ C in your Computer system.


Step 2: Go back to your blogger Dashboard and click on 'Template' Then click on 'HTML' Beside your 'Customize' .


Step 3: Find this code <Data:post.body/> in your blogger Template using CTRL+F in your System. A search Box will appear past the code and press Enter.


Note: You will find the code more than 2 or 3 Times in your Blogger template. Depending on the type of template you are using. And Remember to Expand your Blogger template. After pressing Enter to see the hidden Codes.


Step 4: After Locating the codes then you can add your Ads code below or Above it. Using CTR+ V.


ALSO: Adding  Ads code above 
<Data:post.body/>  means it will appear above your blogger post and Below means it will appear Below your Blogger post.


Note: You will find the code more than 2 or 3 Times in your Blogger template. Depending on the type of template you are using. And Remmember to Expand your Blogger template. After pressing Enter to see the hiden Codes.

Remmember to Share with friends and also support us by Leaving your valuable comment below.


author-pic About author
Paul Nwachukwu writes and manages
GeeksBlogger  he is a lover of Tech, you can
connect with him on Fbtwitter  Visit his blog @
https://geeksblogger.com

Share:

Sunday, 18 December 2016

How to Center Header, Post titles, Dates, Gadgets, and Tabs in Blogger

How to Center Header Post titles, Dates, Gadgets, and Tabs in Blogger


One of the greatest mistake most bloggers make is to forget about the design of their blog. They don't take their blog design serious, believe me or not, blog design is one of the most important thing most blog visitors consider, even advertisers. This is the reason you should keep your blog design professional and user friendly. I have come across so many blogs which have great content but poor blog design. Poor blog design contribute to high percentage of "Bounce rate".

I believe you like what you see on "build a perfect blog". Today I want to show you How to Center Header, Post titles, Dates, Gadgets, and Tabs in Blogger.

Without going so deep, I want to tell you not joke with your blog/website design, try to make it look professional.


Here is a quick and easy tutorial on how you can center all of these things on your blog as well, and do it all through the basic Template editor in Blogger.  We’re just going to add some simple coding to the CSS section in the Template Designer.

 How to do this:

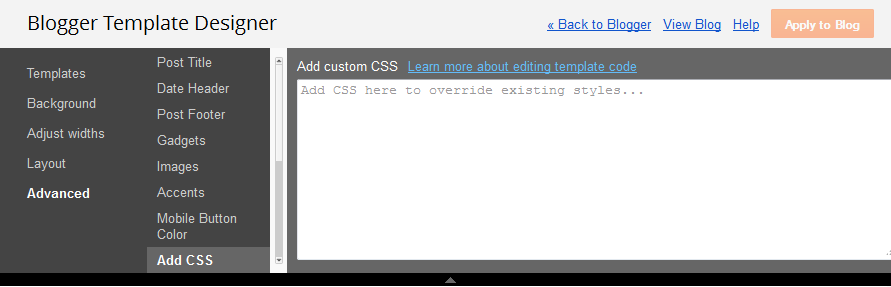
  •  Log into your Blogger account Dashboard
  •  Go into the Template section on the left  
  • Then click the orange Customize button
  • Then go to the Advanced section on the left
  • Scroll down to Add CSS 

Once you are in there, you’re going to want to add the following codes.  Simply copy/paste them into the Add CSS field, and then hit enter between each one.

Code to center your Post & Date Titles in Blogger:

.post-title {
text-align:center;
}


.date-header {
text-align:center;
}

Code to center your Gadget Headers in Blogger:


.widget {
  text-align: center;
}


 Code to center your Tabs in Blogger:


.PageList {text-align:center !important;}
.PageList li {display:inline !important; float:none !important;}


  • Recommended:

You can also leave out any of these you want, and just pick and choose which things you want centered and which you do not. 
If you leave one out, that section will just remain with the basic Blogger settings.

If this post was helpful to you please do not hesitate to like and share with your friends. Drop your comment if you have any issue. If you have used this code let us know if it was help by commenting...Thank you.
Share:

Thursday, 24 November 2016

Add JavaScript Image Slider to Blogger Easily


Adding image slider to your blogger blog does only beautify your blog, but make it easy for users to easily navigate through your blog with no much hustle.

Today I’m sharing a cool JavaScript image slider for blogger. It could be usable as featured content on blogger blog. This image slider is created by menucool.com. A really cool slider is this. It has pretty nice sliding effect, and a less loading time as created by Javascript, no jQuery or flash used. And another thing is it’s easily customizable. I have customized it little to suite perfectly for blogger blog. See Demo or download source code from below link.

Let’s Install the Image Slider to your Blogger Blog

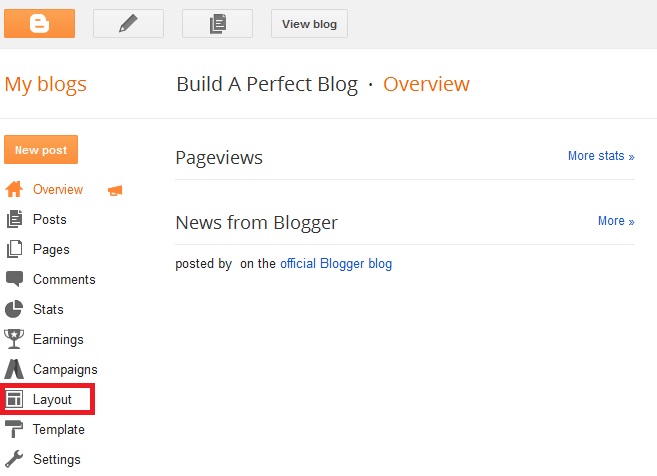
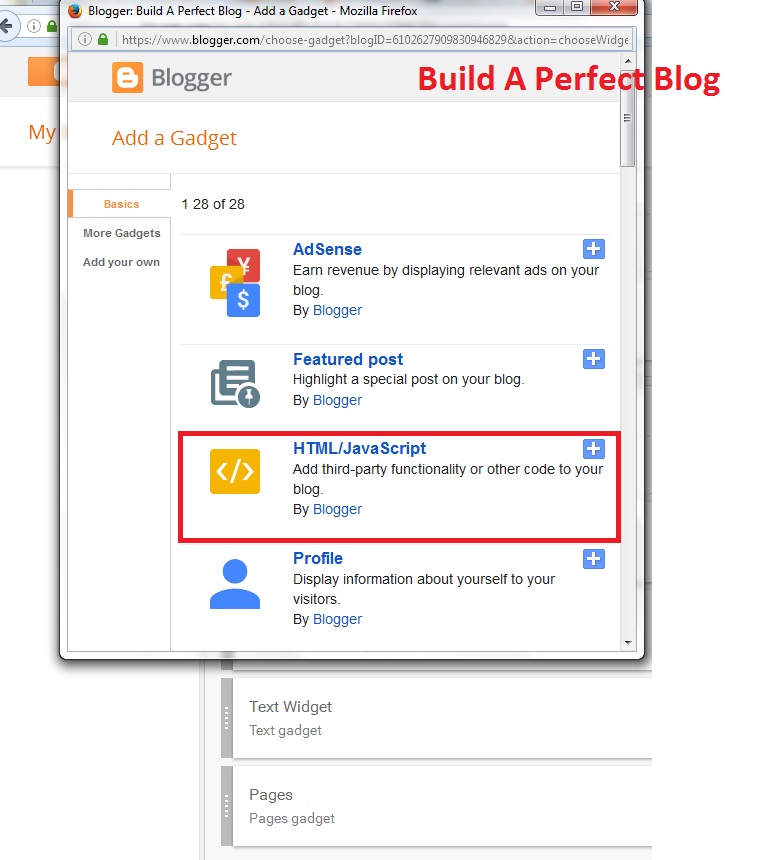
1. Go to Blogger Dashboard > Layout > Add a Gadget
2. Select HTML/Javascript
3. Copy the code below and paste on it.
 
<style type="text/css">
/* http://dimpost.com */

#sliderFrame {
    position: relative;
    width: 700px;
    margin: 0 auto 40px;
}

#slider {
    width: 700px;
    height: 306px;
    /* Make it the same size as your images */
    background: #fff url(http://4.bp.blogspot.com/-aVGCcclfKQo/UR-T3vxFAMI/AAAAAAAABm8/ncwIfUdoLIw/s1600/loading.gif) no-repeat 50% 50%;
    position: relative;
    margin: 0 auto;
    /*make the image slider center-aligned */
    -webkit-box-shadow: 0px 1px 5px #999999;
    -moz-box-shadow: 0px 1px 5px #999999;
    box-shadow: 0px 1px 5px #999999;
}

#slider img {
    position: absolute;
    border: none;
    display: none;
}


/* the link style (if an image is wrapped in a link) */

#slider a.imgLink {
    z-index: 2;
    display: none;
    position: absolute;
    top: 0px;
    left: 0px;
    border: 0;
    padding: 0;
    margin: 0;
    width: 100%;
    height: 100%;
}


/* Caption styles */

div.mc-caption-bg,
div.mc-caption-bg2 {
    position: absolute;
    width: 100%;
    height: auto;
    padding: 0;
    left: 0px;
    bottom: 15px;
    z-index: 3;
    overflow: hidden;
    font-size: 0;
}

div.mc-caption-bg {
    background-color: black;
}

div.mc-caption {
    font: bold 14px/20px Arial;
    color: #EEE;
    z-index: 4;
    padding: 10px 0;
    text-align: center;
}

div.mc-caption a {
    color: #FB0;
}

div.mc-caption a:hover {
    color: #DA0;
}


/* ------ built-in navigation bullets wrapper ------*/

div.navBulletsWrapper {
    top: 320px;
    left: 280px;
    /* Its position is relative to the #slider */
    width: 150px;
    background: none;
    padding-left: 20px;
    position: relative;
    z-index: 5;
    cursor: pointer;
}


/* each bullet */

div.navBulletsWrapper div {
    width: 11px;
    height: 11px;
    background: transparent url(http://3.bp.blogspot.com/-ZUaX5-lcCi4/UR-TzMXcpuI/AAAAAAAABm0/kokxtfFdNcU/s1600/bullet.png) no-repeat 0 0;
    float: left;
    overflow: hidden;
    vertical-align: middle;
    cursor: pointer;
    margin-right: 11px;
    /* distance between each bullet*/
    _position: relative;
    /*IE6 hack*/
}

div.navBulletsWrapper div.active {
    background-position: 0 -11px;
}

.intro {
    bottom: 0;
    color: rgba(0, 0, 0, 0.2);
    font-size: 16px;
    position: absolute;
    right: 0;
    text-decoration: none;
    z-index: 99999;
}


/* --------- Others ------- */

#slider {
    -webkit-transform: translate3d(0, 0, 0);
    transform: translate3d(0, 0, 0);
    -ms-transform: translate3d(0, 0, 0);
    -moz-transform: translate3d(0, 0, 0);
    -o-transform: translate3d(0, 0, 0);
}
</style>
<script src="http://project.dimpost.com/image-slider/js-image-slider.js" type="text/javascript"></script>
<div id="sliderFrame">
    <div id="slider">
        <a href="#"><img src="https://blogger.googleusercontent.com/img/b/R29vZ2xl/AVvXsEhQQWF1aFOKZPeVDe_Z5zsIzNAGeVMXgXXHLBBBGvjmi07F7dCyW1ZnW0qPUEa3joJQp1esKV_TMGToCE6P3fDi2mU3dg1wbA5KPvXGakykNfeWXSpFxR0DUVLNEW4ka2U3oFRBs157Jmwo/s1600/image-slider-1.jpg" alt="#htmlcaption1" /></a>
        <a href="#"><img src="https://blogger.googleusercontent.com/img/b/R29vZ2xl/AVvXsEivKKHNJ3tg3phmgJbkDgNfLpKNBUHmWUKFItdNvqDqeSjhnhoQwDbHiVpONbkuOeVjCtW1eP_ALHpTPk2fh2CodJFGTfwuxrzvKoKpXCwslPxzk1V649snIczZoP4I5vucM5cQhjzUjx9w/s1600/image-slider-2.jpg" alt="Go UP!" /></a>
        <a href="#"><img src="https://blogger.googleusercontent.com/img/b/R29vZ2xl/AVvXsEgVDPyZqhUvdn0qQaWvI23Hx-UwnQp0kmOmrycW4wpBAKgGKAIIQSDbltsYl0NSGwvMZ9ZPNOrI_Np-WFJXTiCDmIq-vffxGO_mvd1QlmapMQQfkg1SjqMQbE8WiKhOGh350eiWXY_JIkAY/s1600/image-slider-3.jpg" alt="Pure Javascript. No jQuery. No flash." /></a>
        <a href="#"><img src="https://blogger.googleusercontent.com/img/b/R29vZ2xl/AVvXsEikq2aCdLWKHwfjsjJdy1KX2efVgmVf2XdXo8QDQtY5TQbi_M0Y9k6yPgtQbca0AmCq7hYQqzj-VBdWFWL3RPj-FiLfgt9TDZB4f0Xb4j565UISCJAy9fSIWwntJC-Jnf737HDeP8OfTwB1/s1600/image-slider-4.jpg" alt="#htmlcaption2" /></a>
        <a href="#"><img src="https://blogger.googleusercontent.com/img/b/R29vZ2xl/AVvXsEiiq6qm2-KF6kjZotbPTj6ywQUEZAy48Hf165fMQB_aSjcKJ-0AqDKaPOZMv7xVgmDc6kCp79E9sgHVUEZvHbc9-EpGO9zSUSIcHXn7DlNTL4WTipvBEP-sFv-_GtEOHSjcZNS3y7wC2KqE/s1600/image-slider-5.jpg" alt="Stay Connected" /></a>
    </div>
    <div id="htmlcaption1" style="display: none;">
        Image Slider by <a href="http://dimpost.com/" target="_blank">DIMPost.com</a>
    </div>
    <div id="htmlcaption2" style="display: none;">
        <a href="http://www.w3schools.com/css/" target="_blank">CSS</a> <a href="http://www.w3schools.com/js/default.asp" target="_blank">JavaScript</a> Rocks.
    </div>
</div>
 
 4. Now you can change Image URL with your own image, slider link/permalink, image caption etc. as your way.
Share:

Sunday, 20 November 2016

How to Change Blogger Background


How to change blogger template background color and image editing or adding some HTML code to your blogger template.

If you have change your Blogger Template from the default blogger template, it will be difficult for you to change your background color or image. If you have been trying to change your blogger background and couldn't, I have found simple way to do that. By following the steps below carefully and correctly, you would be able to change your blogger background to any picture or color of your choice.

You might just want to change your blogger background image or color to suit the look of your blog or you might want to use it for promotional purpose, like Linda Ikeji usually did on her blog.

You need to find and edit this section to add your own background image or color:

To find the code click on Ctrl+F a search box will appear, copy the code below and place in the search box
body {
You will see something similar to the code below;  
body {
  background: #ffffff;
  background-image: url(http://i1273.photobucket.com/albums/y417/trynitezoo/winterpaper_zps5a2f39a3.jpg);
  background-position: center;
  background-repeat: no-repeat;
  background-attachment: fixed;
  background-size: cover;
  width: 100%;
  margin: 0;
}

or you can override the background image. You only need to copy and paste the following code in the header tag section and replace the YOUR NEW IMAGE PATH to the image url you needed:

<style>
  body {
    background-image: url('http://YOUR NEW IMAGE PATH') !important;
  }
</style>
Share:

Sunday, 16 October 2016

How To Display Author Name In Blogger Posts

Adding Author name to Blogger posts is very important, because it gives acknowledgement to the article writer or publisher. Not only that, it can help your blog visitors to identify the content/article writer and perhaps gain a level of trust with you. Adding Author name to blog posts could be of great benefits to blogs with more than one authors.


If you are using Blogger, Blogger collects the data of the author from your blogger profile, so you need to connect your blogger account to Google+ if you haven't done that already. Note that, if have not connected your profile the you can change the name of your blogger account. So that each time that author publish an article, the display name will appear as the name of the author. By doing things each article writer will get proper credit for their work.

Ok, lets start the process, the very  first thing you need to do is Log in to blogger account dashboard, after you are in, head to Template>>Click on HTML.


In the HTML Editor dashboard search for the following code <data:post.body/> tag. Just above this code paste the following coding below, if you want it to show above post or paste it after/below the <data:post.body/>  tag if you want if to show below post. To search for the
<data:post.body/> tag press(Ctrl+F)

<span class='author_mbl'>By: <a expr:href='data:post.authorProfileUrl'> <data:post.author/></a>  </span>
 If you wish to add some styling, you can simply add the following CSS code just above the
]]></b:skin> tag. You can customize it to the way it will suit you blog template. Below is the CSS codes.

.author_mbl a { text-decoration:none;}
.author_mbl a:hover {text-decoration:underline;}
.author_mbl { float:left; color:#555;}
 
Finally, you are done with adding author name in blog posts. Now click the save button, go and take a look at how it looks like. If you followed the steps correctly, then your author name should appear nicely.

I hope this article helped you, though it is very easy to implement some bloggers find it difficult to understand. But I believe it was a success implementing the code. I f you have any issue implementing the code do let me know in the comment box. If you have any question not related to this post that you know I can help, feel free to ask. I will get back to you as soon as possible. Thank you.

Don't hesitate to share this post, follow us on twitter, like our facebook page and subscribe to our newsletter.


Share:

Sunday, 25 September 2016

How To Add Popup Facebook Fan Page To Blogger


Thank you to digital world, where you can reach millions of audience with a blink of an eye, In this time now, Facebook have become the leading social media social media service provider to over 1.3Billion users all over the world, which not less than 800 million log in to there account every day. I would say a very big thank you to this very social media platform, with the help of this platform, bloggers have been able to reach vast number of audience very easily than it use to be.

In order for you to gain or reach out to more audience, you need to take an advantage on social media platforms like, twitter, google+, facebook and many others. but we are focusing on facebook on this post.  

What did you think about sharing your content to you fans and friends on facebook? Sharing your content to this social media platform is the best strategy to get steady flow of audience or readers. I believe you know how it works? You share your content to your friends on facebook, they read it and like it, then they share it to their own friends, their friends will read it and appreciate your work, by sharing it to others and others will read and share it and so on. By doing this you have reach vast number of readers, with just one click on the share button on your facebook, that is the power of social media and how it works.

The most  important thing about facebook is that your readers are not from one country, they are from different countries around the world. On reading this piece completely will enable you to add facebook popup like page on your blogger blog very easy in few steps below.

How To Add Popup Facebook Fan Or Like Page

1. Login to you Blogger account.

2. Click on Layout.

3. On the next screen click on the Add a Gadget on the side bar.

4. On the next small popup window click on HTML/Javascript.

5. Now copy and paste the below code on the blank box


<script src='http://ajax.googleapis.com/ajax/libs/jquery/1.7.2/jquery.min.js' type='text/javascript'></script>
<style>
#fbox-background {
    display: none;
    background: rgba(0,0,0,0.8);
    width: 100%;
    height: 100%;
    position: fixed;
    top: 0;
    left: 0;
    z-index: 99999;
}

#fbox-close {
    width: 100%;
    height: 100%;
}

#fbox-display {
    background: #eaeaea;
    border: 5px solid #828282;
    width: 340px;
    height: 230px;
    position: absolute;
    top: 32%;
    left: 37%;
    -webkit-border-radius: 5px;
    -moz-border-radius: 5px;
    border-radius: 5px;
}

#fbox-button {
    float: right;
    cursor: pointer;
    position: absolute;
    right: 0px;
    top: 0px;
}

#fbox-button:before {
    content: "CLOSE";
    padding: 5px 8px;
    background: #828282;
    color: #eaeaea;
    font-weight: bold;
    font-size: 10px;
    font-family: Tahoma;
}

#fbox-link,#fbox-link a.visited,#fbox-link a,#fbox-link a:hover {
    color: #aaaaaa;
    font-size: 9px;
    text-decoration: none;
    text-align: center;
    padding: 5px;
}
</style>
<script type='text/javascript'>
//<![CDATA[
jQuery.cookie = function (key, value, options) {
// key and at least value given, set cookie...
if (arguments.length > 1 && String(value) !== "[object Object]") {
options = jQuery.extend({}, options);
if (value === null || value === undefined) {
options.expires = -1;
}
if (typeof options.expires === 'number') {
var days = options.expires, t = options.expires = new Date();
t.setDate(t.getDate() + days);
}
value = String(value);
return (document.cookie = [
encodeURIComponent(key), '=',
options.raw ? value : encodeURIComponent(value),
options.expires ? '; expires=' + options.expires.toUTCString() : '', // use expires attribute, max-age is not supported by IE
options.path ? '; path=' + options.path : '',
options.domain ? '; domain=' + options.domain : '',
options.secure ? '; secure' : ''
].join(''));
}
// key and possibly options given, get cookie...
options = value || {};
var result, decode = options.raw ? function (s) { return s; } : decodeURIComponent;
return (result = new RegExp('(?:^|; )' + encodeURIComponent(key) + '=([^;]*)').exec(document.cookie)) ? decode(result[1]) : null;
};
//]]>
</script>
<script type='text/javascript'>
jQuery(document).ready(function($){
if($.cookie('popup_facebook_box') != 'yes'){
$('#fbox-background').delay(5000).fadeIn('medium');
$('#fbox-button, #fbox-close').click(function(){
$('#fbox-background').stop().fadeOut('medium');
});
}
$.cookie('popup_facebook_box', 'yes', { path: '/', expires: 7 });
});
</script>
<div id='fbox-background'>
<div id='fbox-close'>
</div>
<div id='fbox-display'>
<div id='fbox-button'>
</div>
<iframe allowtransparency='true' frameborder='0' scrolling='no' src='//www.facebook.com/plugins/likebox.php?
href=https://www.facebook.com/pages/buildaperfectblog/120574614736021&width=339&height=255&colorscheme=light&show_faces=true&show_border=false&stream=false&header=false'
style='border: none; overflow: hidden; background: #fff; width: 339px; height: 200px;'></iframe>
<div id="fbox-link">Powered by <a style="padding-left: 0px;" href="http://www.buildaperfectblog.com/2016/09/how-to-add-popup-facebook-fan-page-to.html" rel="nofollow">
buildaperfectblog</a></div>
</div>
</div>


 Note: CUSTOMIZE THE FOLLOWING CODE BEFORE SAVING

If you would wish to customize the way the popup page would act on your blog, then below are some changes you should make;

* Change this page ID www.facebook.com/pages/buildaperfectblog/120574614736021  to yours.

* The page is set to popup after five seconds when your blog complete loading. You can change this delay(5000) default delay to a higher figure or lesser as you wish.

* The page is set by default to popup just once, when someone visit your blog. If wish it to show every time a new page is loaded then remove this line of code  $.cookie('popup_facebook_box', 'yes', { path: '/', expires: 7 });

* If you would wish it to popup only on your Homepage each time a user visits, then you need to do some editing on you HTML by searching(CTRL +F) for the clossing body tag </body> . Now copy and paste the below code above the clossing body tag </body>

&lt;b:if cond='data:page.type == "index"'&gt;ADD THE FACEBOOK WIDGET CODE HERE &lt;/b:if&gt;

 * Copy the widget code and paste it inside the conditional tags above where you see
"ADD THE FACEBOOK WIDGET CODE HERE".

6. Now you are done click on the save button.

 Now that you are done with adding the code, go back and view your blog it should up and running very well.

Thank you for reading, I believe this was helpful to you? Please fell free to share this post to your friends. Let me read your comment on the box. If you have any issues with adding this code let me know, it would be my pleasure to help you.
Share:

How To Add Or Change Blogger Favicon

What is favicon?

First, I believe you know what is favicon, if you don't know, favicon is an icon you see at the top left corner of your browser(Chrome, Fire Fox, Opera and the rest) tap. It is very small in size, usually 16px x16 in size.
In case you still wondering what favicon is, take a look at the picture below;


If your created your blog with Blogger, you will see the default favicon of Blogger, which is Orange in colour with a big Letter B in it or Wordpress blue clour with a Big W in it.

To make you blog look more attracting, you need to change your default blogger favicon, by doing this, it will serve as a reminder to your visitors once they see the icon they saw the last time they visited you blog. That is why i will recommend to you, to change your default blogger favicon to make your blog look more inviting and professional. This will give your visitors the impression that you know what you are doing.
Wondering how you are going to change it, you don't need to get worried because, it is very simple to do this. You don't need to be a webmaster to do it. There are two ways to change your Blogger favicon, which are; editing your blogger HTML or through your layout.

The good thing about Blogger is that, they have made it so easy for you to edit some features in your blog without tampering with your HTML Code. This new feature will help you change your Blogger favicon through Layout on you blogger dashboard.

I am going to show you how to change your blogger favicon in few minutes, just follow the steps below to do it;

1. Log in to your Blogger Dashboard.

2. On your Dashboard  click on Layout.

3. On the next screen that appears at the top left corner of your Blogger Layout, click on the Edit button.

4. Now click on the Browse Button as seen below;


5. Click on the save button. 

After uploading you should see your new favicon not the default blogger favicon any more.


Note: If you view your blog and it's not showing, don't get worried because it will take some time to appear in your browser's tap.

The Second Way To Add Or Change Blogger Favicon

Like I mentioned earlier, there are two ways you can add or change Blogger favicon, either by  editing your HTML Codes or through Layout on your dashboard. I have already show you how to use the Layout. Now I want to show you how to exactly by editing your HTML Codes.

Now follow the steps below;

1. On your Blogger dashboard click on Template.

2. Click on Edit HTML.

3. Now click on the expand widget box at the top.

4. Press CTRL+F to search for the below post.

<b:skin>

5. Paste the code below just above the
<b:skin> you searched for.

 <link href="paste your favicon link here" rel="icon" type="image/gif"/>

Note: Make sure you replace paste your favicon link here with you favicon link location.

6. Now you are done, save the Template. Don't be in a haste to see your favicon show because it might take some time to appear.

Just in case you don't know how to create favicon on you own, for your blog then click here to download favicon of you choice. After downloading upload it here  to get the link.


I believe this was helpful to you, please appreciate my effort  by liking and sharing this post to you friends and also like our facebook fan page. Thank you. If it was helpful or you are having any issues let me know on the comment box.


Share:

Monday, 12 September 2016

How To Add YouTube Adsense To Blogger


Can I link my YouTube AdSense account  to my Blogger Account? 

 Answer: Yes, you can.

If yes, then how can I link my YouTube AdSense Account to my Blogger Account to display ads on my Blogger  Blog?


It is obvious that you can associate or link your Approved YouTube AdSense to your Blogger Blog. You might have heard of this, But you do not know how to link it. Or is this your first time reading something like this? No need  to worry at all,  I am going to show you how link your Approved YouTube AdSense to your Blogger Blog in few minutes.
Share:

Saturday, 2 July 2016

How To Add Javascript Codes To Blogger Blog

On this article I am going to take you on how to properly add Javascript Codes to Blogger blog. Many thanks to Blogger that made it so easy for us to implement our blogger blog and also for us to easily add javascript being a Webmaster or Newbie on Blogger Platform.

There are two methods of adding Javascript into Blogger Blog. By Editing the HTML or using the Gadget through Layout option.

Therefore, I am going to take you on only one method of adding the javascript to your Blogger blog  and it is also the easiest way to do that. That is; adding Javascript Gadget through the Layout options.

In just few steps, I am going to show you how to add Javascript using the Layout option from your Blogger Blog.

Lets see how to do that:

Step 1: Logging to your Blogger Blog Dashboard.

Step 2: On your dashboard click on the layout option.


Step 3: On the next page after clicking on the layout as seen below, choose where you want to implement the javascript  code, then click on add a gadget.


Step 4: From the next page that appear you will see many option to add, but click on the add javascript blue plus button.


Step 5: From the box that will appear, implement the javascript code you wish to by pasting the code on the blank box as seen below:


Step 6: Add a title or you leave it blank.


Step 7: Click on the save button.


       Congratulations, now you are done with adding javascript to your blogger's blog.

                                                      Arranging your gadgets

        After adding your javascript, maybe it was a "banner javascript code", you can use the drag and drop tool to arrange where you want the banner to display.
        I believe this article was helpful to you. We would love your comments if you have any issue implementing the code. I will get back to you as soon as possible. Don't hesitate to share this to your friends who might be interested in this article. Do not fail to like us on our social media portals and do also subscribe to our news letters to get updates from this blog once it is updated. Thank You.

Share: