Sunday, 25 September 2016

How To Add Popup Facebook Fan Page To Blogger


Thank you to digital world, where you can reach millions of audience with a blink of an eye, In this time now, Facebook have become the leading social media social media service provider to over 1.3Billion users all over the world, which not less than 800 million log in to there account every day. I would say a very big thank you to this very social media platform, with the help of this platform, bloggers have been able to reach vast number of audience very easily than it use to be.

In order for you to gain or reach out to more audience, you need to take an advantage on social media platforms like, twitter, google+, facebook and many others. but we are focusing on facebook on this post.  

What did you think about sharing your content to you fans and friends on facebook? Sharing your content to this social media platform is the best strategy to get steady flow of audience or readers. I believe you know how it works? You share your content to your friends on facebook, they read it and like it, then they share it to their own friends, their friends will read it and appreciate your work, by sharing it to others and others will read and share it and so on. By doing this you have reach vast number of readers, with just one click on the share button on your facebook, that is the power of social media and how it works.

The most  important thing about facebook is that your readers are not from one country, they are from different countries around the world. On reading this piece completely will enable you to add facebook popup like page on your blogger blog very easy in few steps below.

How To Add Popup Facebook Fan Or Like Page

1. Login to you Blogger account.

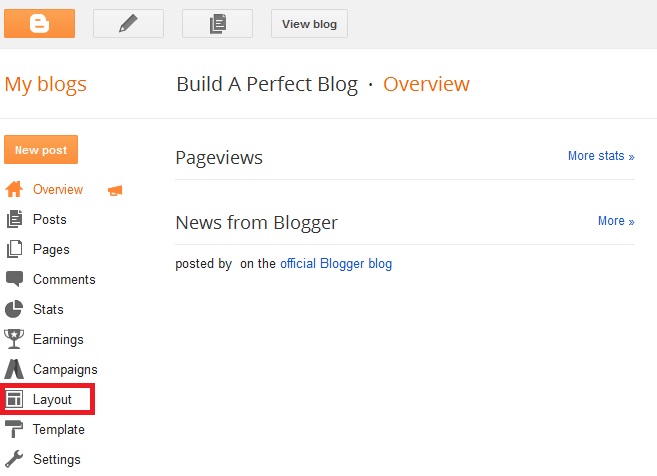
2. Click on Layout.

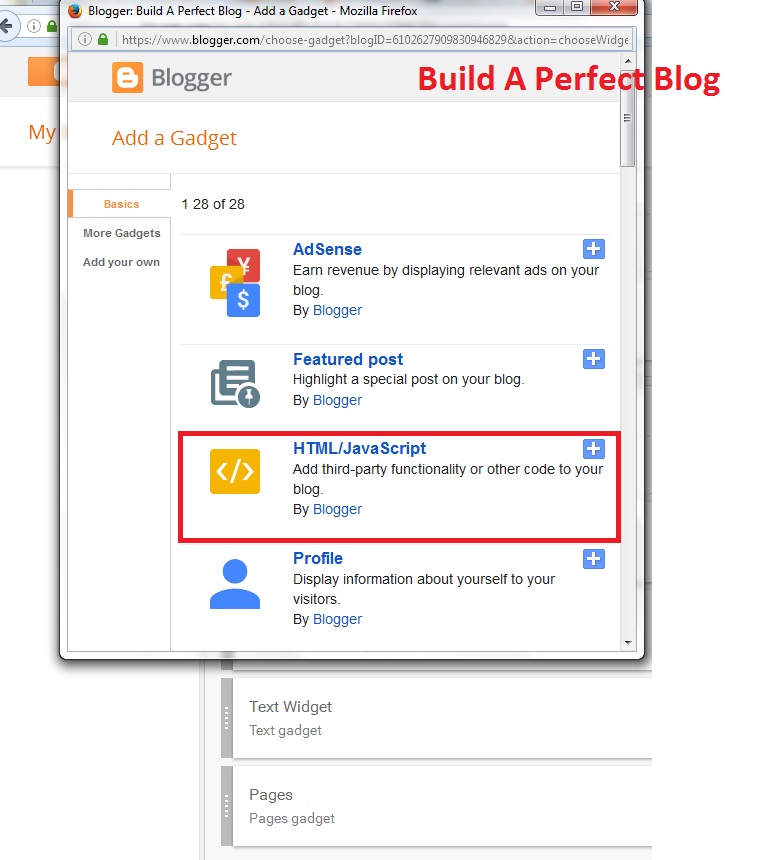
3. On the next screen click on the Add a Gadget on the side bar.

4. On the next small popup window click on HTML/Javascript.

5. Now copy and paste the below code on the blank box


<script src='http://ajax.googleapis.com/ajax/libs/jquery/1.7.2/jquery.min.js' type='text/javascript'></script>
<style>
#fbox-background {
    display: none;
    background: rgba(0,0,0,0.8);
    width: 100%;
    height: 100%;
    position: fixed;
    top: 0;
    left: 0;
    z-index: 99999;
}

#fbox-close {
    width: 100%;
    height: 100%;
}

#fbox-display {
    background: #eaeaea;
    border: 5px solid #828282;
    width: 340px;
    height: 230px;
    position: absolute;
    top: 32%;
    left: 37%;
    -webkit-border-radius: 5px;
    -moz-border-radius: 5px;
    border-radius: 5px;
}

#fbox-button {
    float: right;
    cursor: pointer;
    position: absolute;
    right: 0px;
    top: 0px;
}

#fbox-button:before {
    content: "CLOSE";
    padding: 5px 8px;
    background: #828282;
    color: #eaeaea;
    font-weight: bold;
    font-size: 10px;
    font-family: Tahoma;
}

#fbox-link,#fbox-link a.visited,#fbox-link a,#fbox-link a:hover {
    color: #aaaaaa;
    font-size: 9px;
    text-decoration: none;
    text-align: center;
    padding: 5px;
}
</style>
<script type='text/javascript'>
//<![CDATA[
jQuery.cookie = function (key, value, options) {
// key and at least value given, set cookie...
if (arguments.length > 1 && String(value) !== "[object Object]") {
options = jQuery.extend({}, options);
if (value === null || value === undefined) {
options.expires = -1;
}
if (typeof options.expires === 'number') {
var days = options.expires, t = options.expires = new Date();
t.setDate(t.getDate() + days);
}
value = String(value);
return (document.cookie = [
encodeURIComponent(key), '=',
options.raw ? value : encodeURIComponent(value),
options.expires ? '; expires=' + options.expires.toUTCString() : '', // use expires attribute, max-age is not supported by IE
options.path ? '; path=' + options.path : '',
options.domain ? '; domain=' + options.domain : '',
options.secure ? '; secure' : ''
].join(''));
}
// key and possibly options given, get cookie...
options = value || {};
var result, decode = options.raw ? function (s) { return s; } : decodeURIComponent;
return (result = new RegExp('(?:^|; )' + encodeURIComponent(key) + '=([^;]*)').exec(document.cookie)) ? decode(result[1]) : null;
};
//]]>
</script>
<script type='text/javascript'>
jQuery(document).ready(function($){
if($.cookie('popup_facebook_box') != 'yes'){
$('#fbox-background').delay(5000).fadeIn('medium');
$('#fbox-button, #fbox-close').click(function(){
$('#fbox-background').stop().fadeOut('medium');
});
}
$.cookie('popup_facebook_box', 'yes', { path: '/', expires: 7 });
});
</script>
<div id='fbox-background'>
<div id='fbox-close'>
</div>
<div id='fbox-display'>
<div id='fbox-button'>
</div>
<iframe allowtransparency='true' frameborder='0' scrolling='no' src='//www.facebook.com/plugins/likebox.php?
href=https://www.facebook.com/pages/buildaperfectblog/120574614736021&width=339&height=255&colorscheme=light&show_faces=true&show_border=false&stream=false&header=false'
style='border: none; overflow: hidden; background: #fff; width: 339px; height: 200px;'></iframe>
<div id="fbox-link">Powered by <a style="padding-left: 0px;" href="http://www.buildaperfectblog.com/2016/09/how-to-add-popup-facebook-fan-page-to.html" rel="nofollow">
buildaperfectblog</a></div>
</div>
</div>


 Note: CUSTOMIZE THE FOLLOWING CODE BEFORE SAVING

If you would wish to customize the way the popup page would act on your blog, then below are some changes you should make;

* Change this page ID www.facebook.com/pages/buildaperfectblog/120574614736021  to yours.

* The page is set to popup after five seconds when your blog complete loading. You can change this delay(5000) default delay to a higher figure or lesser as you wish.

* The page is set by default to popup just once, when someone visit your blog. If wish it to show every time a new page is loaded then remove this line of code  $.cookie('popup_facebook_box', 'yes', { path: '/', expires: 7 });

* If you would wish it to popup only on your Homepage each time a user visits, then you need to do some editing on you HTML by searching(CTRL +F) for the clossing body tag </body> . Now copy and paste the below code above the clossing body tag </body>

&lt;b:if cond='data:page.type == "index"'&gt;ADD THE FACEBOOK WIDGET CODE HERE &lt;/b:if&gt;

 * Copy the widget code and paste it inside the conditional tags above where you see
"ADD THE FACEBOOK WIDGET CODE HERE".

6. Now you are done click on the save button.

 Now that you are done with adding the code, go back and view your blog it should up and running very well.

Thank you for reading, I believe this was helpful to you? Please fell free to share this post to your friends. Let me read your comment on the box. If you have any issues with adding this code let me know, it would be my pleasure to help you.
Share:

How To Add Or Change Blogger Favicon

What is favicon?

First, I believe you know what is favicon, if you don't know, favicon is an icon you see at the top left corner of your browser(Chrome, Fire Fox, Opera and the rest) tap. It is very small in size, usually 16px x16 in size.
In case you still wondering what favicon is, take a look at the picture below;


If your created your blog with Blogger, you will see the default favicon of Blogger, which is Orange in colour with a big Letter B in it or Wordpress blue clour with a Big W in it.

To make you blog look more attracting, you need to change your default blogger favicon, by doing this, it will serve as a reminder to your visitors once they see the icon they saw the last time they visited you blog. That is why i will recommend to you, to change your default blogger favicon to make your blog look more inviting and professional. This will give your visitors the impression that you know what you are doing.
Wondering how you are going to change it, you don't need to get worried because, it is very simple to do this. You don't need to be a webmaster to do it. There are two ways to change your Blogger favicon, which are; editing your blogger HTML or through your layout.

The good thing about Blogger is that, they have made it so easy for you to edit some features in your blog without tampering with your HTML Code. This new feature will help you change your Blogger favicon through Layout on you blogger dashboard.

I am going to show you how to change your blogger favicon in few minutes, just follow the steps below to do it;

1. Log in to your Blogger Dashboard.

2. On your Dashboard  click on Layout.

3. On the next screen that appears at the top left corner of your Blogger Layout, click on the Edit button.

4. Now click on the Browse Button as seen below;


5. Click on the save button. 

After uploading you should see your new favicon not the default blogger favicon any more.


Note: If you view your blog and it's not showing, don't get worried because it will take some time to appear in your browser's tap.

The Second Way To Add Or Change Blogger Favicon

Like I mentioned earlier, there are two ways you can add or change Blogger favicon, either by  editing your HTML Codes or through Layout on your dashboard. I have already show you how to use the Layout. Now I want to show you how to exactly by editing your HTML Codes.

Now follow the steps below;

1. On your Blogger dashboard click on Template.

2. Click on Edit HTML.

3. Now click on the expand widget box at the top.

4. Press CTRL+F to search for the below post.

<b:skin>

5. Paste the code below just above the
<b:skin> you searched for.

 <link href="paste your favicon link here" rel="icon" type="image/gif"/>

Note: Make sure you replace paste your favicon link here with you favicon link location.

6. Now you are done, save the Template. Don't be in a haste to see your favicon show because it might take some time to appear.

Just in case you don't know how to create favicon on you own, for your blog then click here to download favicon of you choice. After downloading upload it here  to get the link.


I believe this was helpful to you, please appreciate my effort  by liking and sharing this post to you friends and also like our facebook fan page. Thank you. If it was helpful or you are having any issues let me know on the comment box.


Share:

Monday, 12 September 2016

How To Add YouTube Adsense To Blogger


Can I link my YouTube AdSense account  to my Blogger Account? 

 Answer: Yes, you can.

If yes, then how can I link my YouTube AdSense Account to my Blogger Account to display ads on my Blogger  Blog?


It is obvious that you can associate or link your Approved YouTube AdSense to your Blogger Blog. You might have heard of this, But you do not know how to link it. Or is this your first time reading something like this? No need  to worry at all,  I am going to show you how link your Approved YouTube AdSense to your Blogger Blog in few minutes.
Share:

Saturday, 2 July 2016

How To Add Javascript Codes To Blogger Blog

On this article I am going to take you on how to properly add Javascript Codes to Blogger blog. Many thanks to Blogger that made it so easy for us to implement our blogger blog and also for us to easily add javascript being a Webmaster or Newbie on Blogger Platform.

There are two methods of adding Javascript into Blogger Blog. By Editing the HTML or using the Gadget through Layout option.

Therefore, I am going to take you on only one method of adding the javascript to your Blogger blog  and it is also the easiest way to do that. That is; adding Javascript Gadget through the Layout options.

In just few steps, I am going to show you how to add Javascript using the Layout option from your Blogger Blog.

Lets see how to do that:

Step 1: Logging to your Blogger Blog Dashboard.

Step 2: On your dashboard click on the layout option.


Step 3: On the next page after clicking on the layout as seen below, choose where you want to implement the javascript  code, then click on add a gadget.


Step 4: From the next page that appear you will see many option to add, but click on the add javascript blue plus button.


Step 5: From the box that will appear, implement the javascript code you wish to by pasting the code on the blank box as seen below:


Step 6: Add a title or you leave it blank.


Step 7: Click on the save button.


       Congratulations, now you are done with adding javascript to your blogger's blog.

                                                      Arranging your gadgets

        After adding your javascript, maybe it was a "banner javascript code", you can use the drag and drop tool to arrange where you want the banner to display.
        I believe this article was helpful to you. We would love your comments if you have any issue implementing the code. I will get back to you as soon as possible. Don't hesitate to share this to your friends who might be interested in this article. Do not fail to like us on our social media portals and do also subscribe to our news letters to get updates from this blog once it is updated. Thank You.

Share:

Tuesday, 28 June 2016

How To Add "Read More" Blogger Post


First of all, you are welcome to Build A Perfect Blog. Here we make all the impossible possible for Bloggers both Newbies and Professionals.


This is very important for all bloggers. As a newbie you have to make your blog look more professional to attract your readers and to make it possible for them to navigate through different topics on your blog through the help of adding the 'Read More' link. Thanks to Blogger for making it very easy for us to add the 'Read More' link to our blog post. Blogger has made it possible for us with no HTML editing, no HTML code adding. So, don't be afraid even if you have little or no knowledge about HTML you can still do this.

In this article will guild you through, in a very short and simple steps on how to add the “Read More” link to to your Blogger blog post.

Here is the deal! Ok let's head there!

Step 1. >> Login to your Blogger Blog

Step 2. >> Head to your Blogger Dashboard

Step 3. >> Click on the orange colour 'New Post' button at the top left corner of your Blogger dashboard. It will take you to a new page where you can write your new blog post. Then write your post, after writing your post, on the body of the post where you wish to add the 'Read More' link, place your cusor there and click on the post. Now head to the final step.

Step 4. >> Click at the 'Jump Break' icon at the top level. See picture below...


Note: This is manual adding of the 'Read More' link, which will be done manually each time you are writing a blog post.

On my next post I shall show you how to add Auto 'Read More' link to your Blogger Blog post.

I believe this article was helpful to you. If you have any problem with adding the 'Read More' link, please don't hesitate to drop your comment on the comment box, I will get back to you as soon as possible. Don't forget to share and like our social media pages. Looking forward to read your comment.Thank you.
Share:

How To Build High Quality Backlinks

  Welcome to Build A Perfect Blog. In this article am going to take you on how to build quality backlinks. This is the most important thing that many Bloggers don't really do, but it is very important. Because getting high quality backlinks, create more web traffic and is one of the most popular method to boost your content on the  competition of Blogsphere. However, getting the method to good high quality backlinks might take a little bit of your time. But believe me it is the right thing to do.

  Firstly, you need to start by understanding what Backlinks is and it benefit to your content. Then you can start extend your efforts to build even more Backlinks using a creative and an effective way that will maximize the potential of your content.

  What is Backlink ?

  Backlink is an incoming Hyperlink that connects the web page or content to another website. You know, Backlinks are very important when it comes to page ranking, because Google rates them highly. Meanwhile, the Backlinks themselves must be of good quality in order to generate the ranking needed to boost your content ranking aheead of the competition 

  Having quality Backlinks is very important because, having 20 good Backlinks is better than having 100 bad once, because the 20 quality Backlinks will beat  the 100 bad once in terms of Google ranking. This is why you must start to strive for quality Backlinks every time. Although, it might take you time to build backlinks to your contents, because people will like to see it and decide to link to it, in order to add more value to there site or blog.

  If you have decided to start building quality Backlinks, then you have made the right decision. It is just for you to wait to see the good result of your hard work.

Write A Long And Interesting Article 

Now you need to know that one of the way of building quality Backlinks is; is creating long and interesting post, that uses chart, images  and other graphics to really make it interesting. Your article will have to be at lease 1000 to maybe 1300 or 2000 words long and make sure you are giving your reader the real and good information that they need.

Create Special Days

  Another good way of getting good quality Backlinks is observing  special days like; Valentine's Day, Easter's, Christmas and the rest of it, to offer discount to on your products or services. 

  Note that, you will need to do some analysis to know the kind of holidays your audience like to know the type of content that best match there interest. But I think Valentine days are wildly observe and everyone love to share. So, I prefer you should write good content and raise your campaign on valentine days, which is bound to get high traffic and quality Backlinks.

Guest Blogging

  Do you want to make a good impression? if yes. Then Guest Blogging is one of the best way to get quality Backlinks. Just look for a good place to write guest blog, believe me your post is going to go viral if you do this and not only go viral, but it will also help someone else out and in return you will get huge traffic and quality Backlinks as well.

  Understand that it will consume you time writing interesting content. But if you can pull through it, the you stint as a Guest Blogger will pay off big time for your efforts. One important thing you should consider as Guest Blogger is to write a related and interesting post that will attract readers attention and also provides room for you to write another post for the Blogger.

  Guest Blogging can be more rewarding in many ways than one. So, if you have the time to do thing right, the you should market your services as Guest Blogging.

Interact With Other Blogs 

  When you visit other Blogs or see other videos you like and it is within your Niche don't just read or view and say "Nice Job" and leave it at that. Make sure you write good and interesting comment or reviews so that you can really extend your thoughts. Don't fail to be  positive, articulate and get straight to the point. Make it very friendly and understandable to create more audience and also drop a link related to that topic to create a unique Backlinks. 

Offer Free Products And Services

You know this days everyone wants it free. So offering free product might be a little bit expensive but believe me it will boost your audience level. You can offer free e-Books or Promotional gift if you want to. Then, by doing this your services might be needed more than often.


Share: